Little Claire Friday Blog Project - Let's Shake Things Up A Bit!

Here's what you'll need to make the card:
pale blue card
6" square card blank
acetate
shaker contents (I've used table confetti)
white Card Candi
your choice of colouring medium
circle and scalloped circle dies (I've used Spellbinders dies)
large double sided foam pads or foam tape
And this is what you need to do:
1. Cut a piece of what card measuring 11.5cm square and stamp the three snowman image in the middle of the card using the Memento ink. Colour the image. I always use a pale grey pen (I use the Cool Grey 1 Promarker) to outline the snow on the image. So here I've used it on the roofs and around the lines of the snowmen. I think it gives a bit more depth than just leaving the snow white.

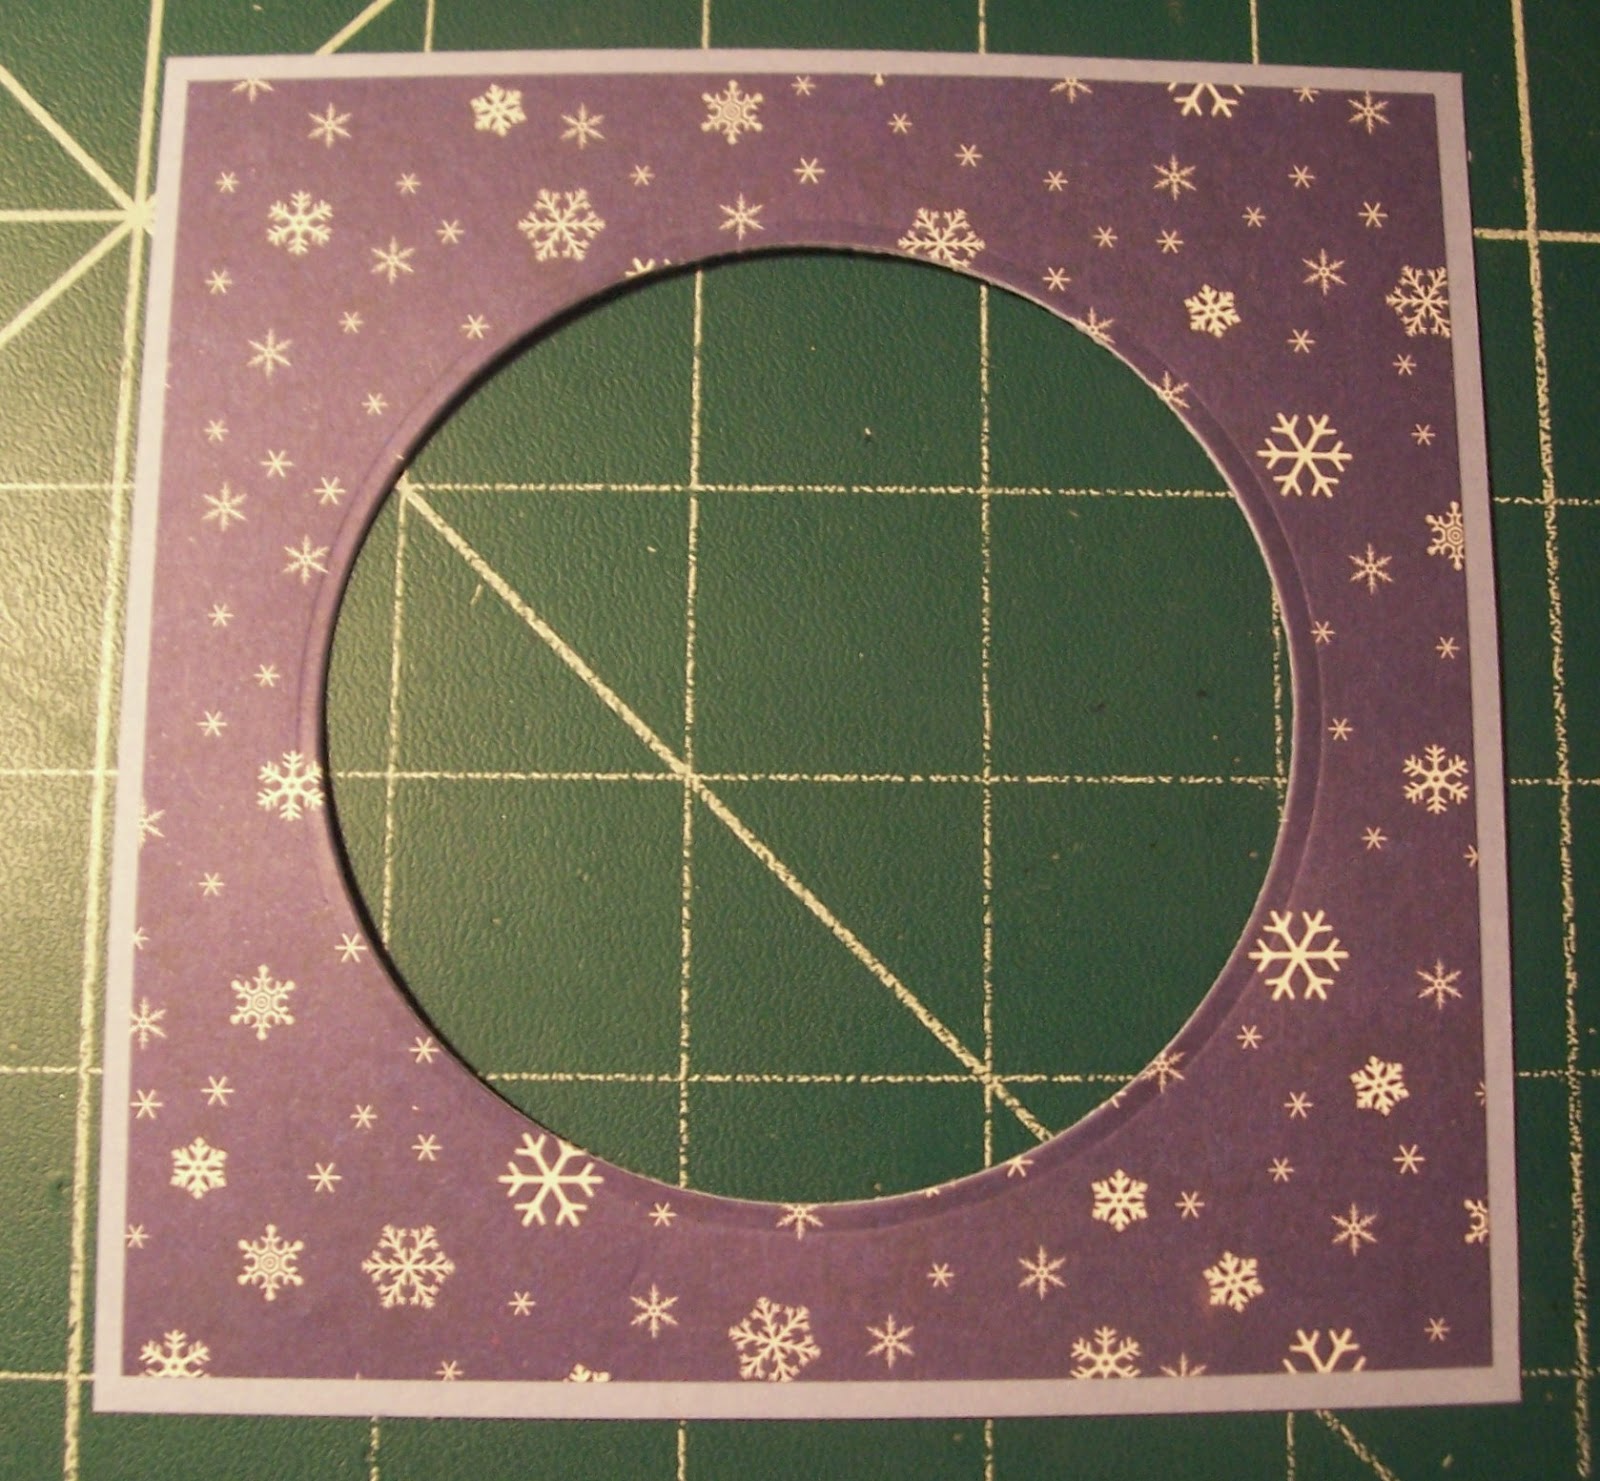
2. Cut a square of pale blue card measuring 12.5cm square and mat on to this a square of patterned paper measuring 12cm square. Die cut a circle out of the middle of this panel - I used the second largest Spellbinders die.
3. Turn the panel over and put strips of double sided tape along each edge. Cut a piece of acetate measuring 12cm square and attach to the tape to form the window over the aperture. Next stick pieces of foam tape around the edge of the aperture making sure you stick each piece right up to the corner of the previous piece as shown in the picture below. The tape is going to form the seal to keep the contents of your shaker card in place so you need to make sure nothing can get out.

4. Put your stamped image flat on the table and put some of your shaker contents on top of the image. Don't overload the shaker - the table confetti I've used is quite big so I put too much in it would cover the image! Use an anti-static pad or a cotton but with some talc on it to rub along the inside edge of the foam pads - this helps stop the shaker contents sticking to the pads. Place the patterned paper panel over the stamped image and then press gently to ensure the foam pads are stuck down.

5. Next cut a frame out of white card to go round the aperture. Use the same circle die you used to cut out the aperture in the patterned paper panel and the scalloped die which is the next size up as shown in the photo below:

6. This is how your die cut frame shout look:

7. Stick the frame round the aperture.
8. For the base of the card, cut a piece of blue card measuring 14cm square. Mat a piece of patterned paper measuring 13.5cm square on top of this as shown in the photo below:

9. Stick the shake unit to the front of the card as shown in the photo below. Stamp the sentiment and trim around it, attaching it to a piece of pale blue card and then to one of the corners of the card. Put Card Candi in the other three corners:

This project appeared on the Little Claire blog here on 10 October 2014
*******************************************
Little Claire Friday Blog Project - Daisy Bear Gift Box

For this week's Friday Blog Project and I've made a gift box which could be used for lots of different occasions. The box has an aperture in the lid and I've added some acetate - it's also lined with matching paper.
I hope you're sitting comfortably because there are lots of photos ahead!!
Here's what you'll need to make the box:
sentiment stamp
3 pieces of A4 card - I've used dark brown
patterned paper
shaped dies - I've used circles and scalloped circles
acetate
Promarkers - Sandstone, Caramel, Cool Grey 3, Rose Pink, Carnation, Satin
white Card Candi
red line double sided tape
1. To make the base of the box, cut a piece of brown card to measure 20.5cm square and score each side at 3cm as shown in the photo below:

2. On the inside of the base, attach a piece of patterned paper measuring 13cm square as show below:

3. To make up the box, cut away triangles at each corner of the base as shown in the photo below:

4. Fold the triangle that is left up to meet the side of the base next to it and stick the two pieces together using red line tape - the photo below shows the first corner stuck in place:

5. And this is what the base should look like when you've finished:

6. To make the lid, cut a piece of brown card to measure 21cm square and score each side at 3cm as you did with the lid. Cut two pieces of patterned paper to measure 14cm square. On the inside of the lid, attach one of the pieces of paper using masking tape as shown in the photo below:

7. On the outside of the lid, attach the other piece of patterned paper with double sided tape - this piece will be staying in place. Next you need to cut the aperture out of the lid. I've used circle and scalloped circle dies - the circle die needs to be the size below the scalloped circle die. I've stuck it to the lid with some masking tape, positioning the die in the middle of the patterned paper as shown below:

8. Once you've die cut the circle, turn the lid over and remove the paper attached with the masking tape. Attach a piece of acetate measuring 12cm square over the circular aperture as shown in the photo below:

Sorry about the photo - you can see my daylight lamp reflected in the acetate!
9. Next stick the paper with the die cut circle back over the inside of the lid - this covers the edges of the acetate and neatens it:

10. To make the scalloped border for the top of the box, use the same circle die as you used to cute the aperture in the lid and the scalloped die which is the size above. Use masking tape to hold them in place on the brown card as shown in the photo below:

11. This is what your frame will look like once it's cut:

12. Turn the lid back over to the front and attach the frame over the circular aperture. Cut four pieces of patterned paper measuring 14.5cm by 2.5cm and attach these to the sides of the lid as shown in the photo below:

13. Assemble the lid in exactly the same way as described above for the base:

14. Here's the side view of the box:

15. To decorate my box I stamped 'Daisy Bear' in Tuxedo Black Memento ink and then coloured the image with Promarkers. I trimmed the image and matted it on to brown card. Next I stamped a sentiment in Rich Cocoa Memento ink and matted it on to brown card. I attached these to the front of the box in opposite corners. Don't forget, don't put any double sided tape on that part of the image panel which overlaps the acetate! I've also coloured four pieces of Card Candi with my Caramel Promarker and added these to finish the box.
This is what the final version looks like:

The box could be used for chocolates, tea lights, notelets and lots of other things. It's also easy to adjust the size of it - just remember to make the lid of the box slightly larger than the base so they fit together easily.
This project appeared on the Little Claire blog on 22 August 2014 here.
*****************************************
Little Claire July 2014 Club Card
This appeared on the Little Claire blog on 22 July

For anyone who isn't part of the club, members receive a brand new Little Claire stamp each month together with the materials and instructions to make a card. There are also instructions for two more cards and exclusive news and special offers. You also get a 10% discount on all purchases online, by phone or at shows and free postage! For more information click here to go to the Little Claire website for all the details.
On to the July club card. I find that I get the best results with silhouette stamps when I stamp using a Versafine ink pad - for this card I used the Onyx Black pad which is available here on the Little Claire website. It's a 'juicier' pad than the Memento ink (which needs to be used with alcohol markers) but still gives very clear and fine detail. When you're inking the silhouette make sure you move the ink pad round as you ink the stamp - this avoids any lines from the edge of the ink pad appearing on your stamped image.
I also find it easier to use some padding under the card I'm stamping on to - the stamping mat sold by Little Claire here is ideal for this.

1. The base card is a square 14.5cm square card blank. Open it out and then cut one panel of the card so you are left with a piece measuring 5cm high as shown in the photo above.

2. Next mat together a piece of black paper (14cm square) and a piece of patterned paper (13.5cm square) as shown above.

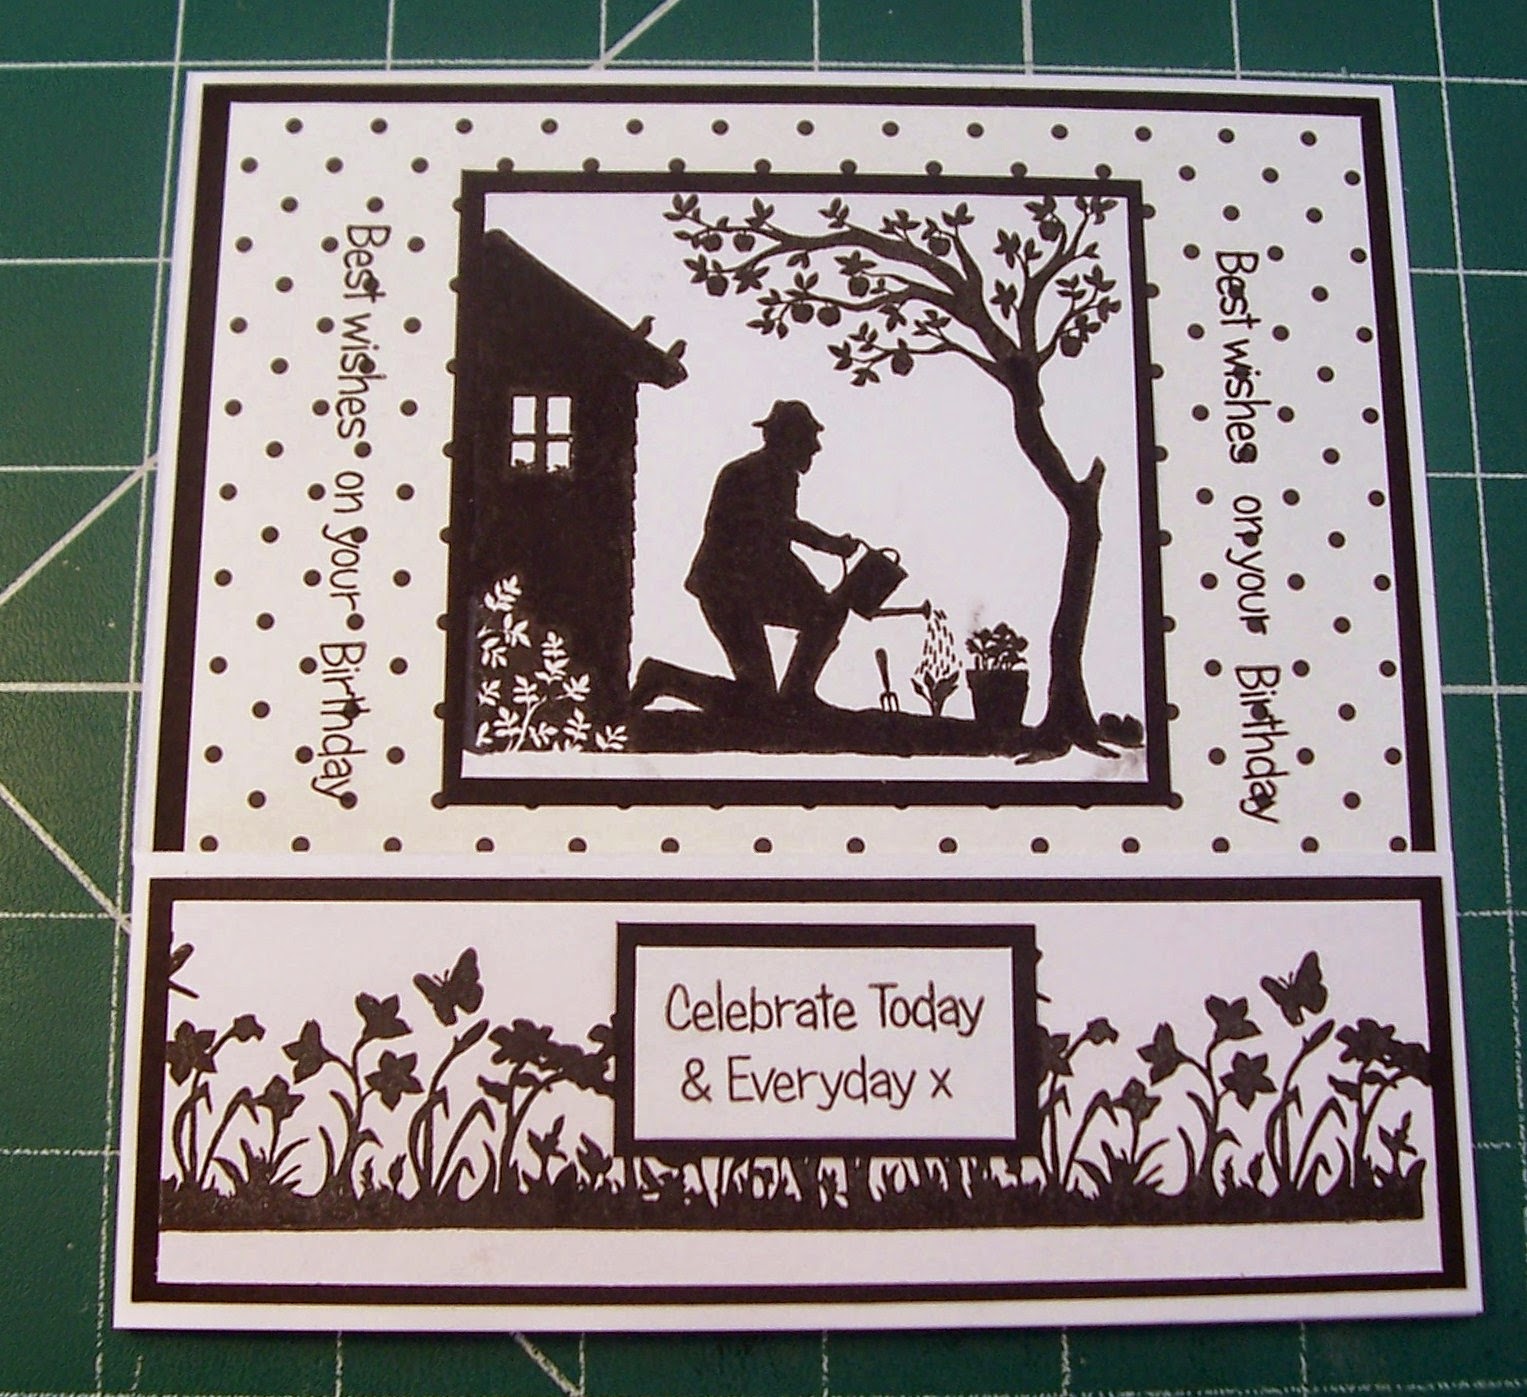
3. I've used the sentiment 'best wishes on your birthday' stamped direct on to the patterned paper. To make it easier to stamp, I put the entire sentiment on the acrylic block at once and also used on the lines on my cutting mat to line up the stamps on the block. This is a great way to ensure your stamping is straight - line the acrylic block up with one of the lines on your stamping mat and then use another of the lines to get your stamps in place straight as shown in the photo above.

4. Use the dots on the paper and a ruler to line up the sentiments on each side as shown above.

5. This is the completed stamped paper.

6. Mat the paper on to the inside of the card as shown in the photo above.

7. Next stamp the floral border twice on a piece of white card measuring 13.5cm by 4cm. You will be stamping one complete border and part of a second one so make sure you stamp on to scrap paper. Stamp the 'celebrate today & everyday' sentiment on to a piece of white card measuring 4cm by 2cm as shown above.

8. Mat the floral border on to black paper measuring 14cm by 4.5cm and the sentiment on to black paper measuring 4.5cm by 2.5cm as shown above.

9. Attach the border image to the front of the card and the sentiment panel in the middle of the border image as shown above.

10. Stamp the main image on to a piece of white card measuring 7cm by 7.5cm.
11. Mat the image on to a piece of black paper measuring 7.5cm by 8cm and attach to the inside of the card - close the front of the card across to make sure you put the image high enough to be seen clearly.

And here's another view of the final card.
*********************************************
Little Claire Blog Project - Gift/Money Wallet
This appeared on the Little Claire blog on 4 July 2014

Good morning everyone, it's Helen N here this week with our Friday blog project. Today I'm sharing a variation of a project I designed for one of my recent Little Claire classes - it's a little gift wallet which could be used for money, gift tokens etc.
Here's what you need to make the project:
red card (you need one A4 sheet)
red ribbon
And here's what you need to do:
1. Cut down your sheet of A4 card so it measures 12cm by the length of the card. Starting from the left hand side, score the card at 12cm, 13.5cm, 25.5cm and 26cm as shown in the photo below:

2. Cut two pieces of red card measuring 6cm by 12 cm and score this at 2cm and 4cm as shown in the photo below:

3. Push out one of the die cut squares from the sheet and trim it to measure 8cm square. Mat this on to a piece of kraft paper measuring 8.5cm square as shown in the photo below:

4. Crease and fold the the larger piece of card into the wallet shape (don't stick it together at this stage). On the front panel mat a piece of kraft paper measuring 11.5cm square and a piece of patterned paper measuring 11cm square as shown in the photo below:

5. On the 'flap' on the front of the wallet, mat a piece of kraft paper measuring 11.5cm by 3cm and a piece of patterned paper measuring 11cm by 2.5cm as shown in the photo below:

6. Attach the image panel on the front of the wallet, remembering to attach it so it can be seen once the 'flap' is closed on the top of the wallet:

7. Concertina fold the other two pieces of red card - these are going to form the sides of the wallet. Using red liner tape attach one side of the folded side to the panel of the wallet directly under the flap as shown in the photo below:

8. Then apply tape to the other side and stick the two panels together leaving the straight piece at the bottom of the wallet as shown in the photo below:

9. This is how it looks from the top, looking in to the wallet:

10. To finish I added a white Card Candi to the flap, some red gems and tied it together with red ribbon:

This is the version I designed for my class using another of the die cut squares from the same sheet:

And here's another one using the 'Oh Man' stamp set and the male set of 'Rebecca's Really Useful Sentiments':

***********************************************
Little Claire Blog Project - Baby Pop Up Box Card
This appeared on the Little Claire blog on 16 May 2014

I designed this card for my last Little Claire class - it's a very simple pop-up box card and my aim at the class was to show everyone the basic construction. It's easy to add more images and embellishments once you can make the box itself. This version folds down and will fit in a six inch square envelope.
I've taken lots of photos to show how the card fits together so you might want a cup of tea or coffee before you start reading!!
Here's what you will need to make the card:
'Dictionary Definitions' stamp set
A4 piece of blue card plus some extra pieces
Promarkers - Caramel and Pastel Blue
red liner tape
And this is what you need to do:
1. Using the piece of A4 card, with the longest side facing you, score a piece of A4 card at 7cm, 14cm, 21cm and 28cm. Turn the card round and score at 7cm and then cut at 15cm. You will be left with a piece of card measuring 29.5cm by 15cm.
2. Next find the panels which measure 7cm by 7cm and cut away the small end portion – this measures 7cm by 1.5cm. Cut from the top of these panels to the middle score line. The piece of card you are left with forms the base of the card box and will fold round and attach using the remaining small flap.
You can see all the measurements and where to cut on the template below:

3. This is what your box should look like once you've cut away the end piece and cut from the top to the middle of the panels as described above. Fold the cut panels back as shown in the photo:

4. Put some red liner tape on the little flap of card left on the bottom of the card

5. Next assemble the box using the little tab to attach it together:

6. For the back of the box (the section that is upright) cut an additional piece of card measuring 15cm by 7cm and score at 7cm. Stick this to the outside of your box.

7. To make the strut (the piece of card that goes across the box to support the image) to, cut a piece of card measuring 10.5cm by 2cm and score at 2cm one end and 1.5cm the other end. Fold this to a ‘Z’ shape:

8. Attach this to the inside of the box, near to the top of the box, using red liner tape:


9. Stamp the little boy outfit on to a piece of white card measuring 6cm by 5cm using the Memento ink. Stamp it a second time on a piece of the gingham paper:

10. Cut out the little shorts (with the top bit - not sure what the official name for it is!!) from the gingham paper. On the white card, colour in the coat hanger and the edges of the t-shirt sleeves:

11. Next glue the cut out shape on to the white card directly over the stamped image:

12. Mat the white card on to a piece of blue card measuring 6.5cm by 5.5cm and a piece of blue card measuring 7cm by 6cm. Attach this to the strut across the card using red liner tape. I stuck the panel towards the top of the strut so that as much as possible of the image will be visible:

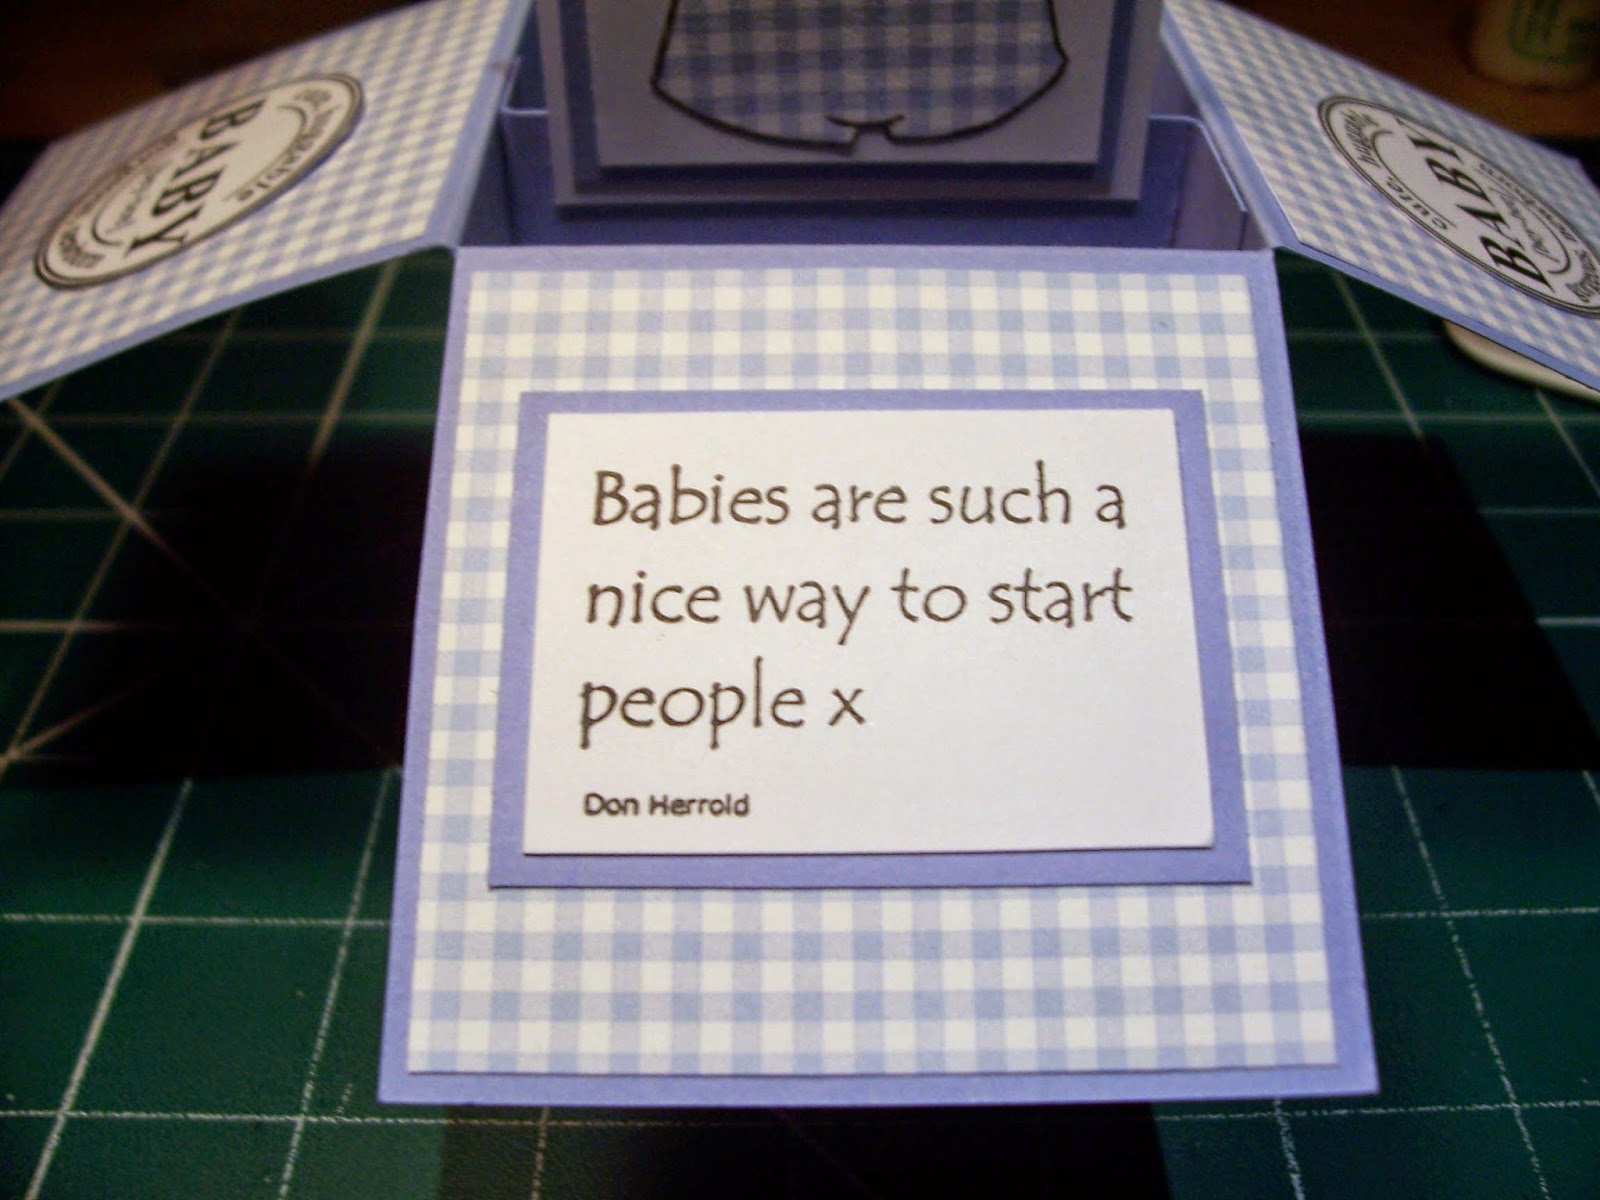
13. Finally, decorate the rest of the card. I used panels of pale blue gingham paper. The panels on the base of the card measure 7.5cm by 6.5cm and the panels on the flaps 6.5cm by 6.5cm. On the front flap I used the main sentiment from the stamp set - stamped on a piece of white card measuring 5cm by 3.5cm and then matted on to a piece of blue card measuring 5.5cm by 4cm:
14. On the two side panels, I used the 'baby' stamp from the 'Dictionary Definitions' set stamped on white card and then cut out:

15. Once you've finished, your card will fold down like this to go in the envelope:

So, here's the final card again:

and this is another version I made using the same basic construction and 'The Smile I Bring' stamp set:

***********************************************
Little Claire Blog Project - Double Dutch Fold Card
This appeared on the Little Claire blog on 14 March 2014

I've made a double dutch fold card using the very cute 'Daisy Bear' stamp. It's a very easy card to make - this is what you'll need:
peel off sentiment
and this is how you make the card:

1. To make the card base, you need to cut two pieces of white card. The first piece measures 25cm by 11.5cm. With the longer edge towards you, score at 10cm and then turn the card round. Fold the shorter flap down- this is the piece on the left in the photo above. The second piece measures 24cm by 5cm. With the longer edge towards you, score this piece at 6cm and 18cm and fold the two end flaps as shown on the right in the photo above.

2. Put the smaller strip to one side and attach paper to the inside of the larger card - I used a kraft layer measuring 14.5cm by 11cm followed by a piece of pink patterned paper measuring 13.5cm by 10cm.

3. Next, attach paper to the shorter front flap (above) - I used a kraft layer measuring 9.5cm by 11cm followed by a piece of pink patterned paper measuring 8.5cm by 10cm.

4. To make the card stand up, the smaller piece of card now needs to the attached to the back of the decorated piece. The photo above shows the two pieces stuck together - the smaller piece 'wraps' round the other piece. I have attached paper to the smaller panels which will be seen from the front of the card as shown in the photo below. I used kraft paper measuring 5.5cm by 4.5cm and pink patterned paper measuring 5cm by 4cm

This is how your card base should look (photo above).

5. To finish the card, stamp 'Daisy Bear' on to a piece of white card measuring 8cm by 6cm using the Tuxedo ink pad and then colour using Promarkers. Mat this on to a piece of kraft paper measuring 8.5cm by 6.5cm and then attach this to the front shorter flap. I added a peel off greeting and some gems and two punched hearts on the two smaller panels.
Here's another example of the same type of card using 'Butterfly Blossom'.

*************************************
Little Claire Blog Project - Up, Up and Away
This appeared on the Little Claire Blog on 31 January 2014

My card is a combination of two cards I designed for the recent 'Be the First' class here on Wirral - I'll be showing you some simple masking plus a card shape which is a bit different.
To make the card you will need:
dark brown paper
post-it notes
Promarkers
And this is what you need to do:

1. Let's start with the masking on the stamped image. The great thing about the 'Hot Air Balloon' stamp is that it comes in four separate pieces - three different sized balloons plus the grass/ground. I started by stamping the largest balloon on to a piece of white card measuring 10.5cm by 9cm. I used the Rich Cocoa Memento pad and stamped my balloon on the left hand side of the card about half way down.

2. Next, I stamped the balloon again on to a post-it note - making sure I stamped as close the the sitcky part of the post-it as possible. Cut out the balloon as shown in the photo above.

3. Carefully stick the balloon stamped on the post-it note over the balloon stamped on the card as shown in the photo above.

4. Stamp the balloon again to the right of the first stamped image and above it leaving the post-it mask in place - overlap the two images as shown in the photo above.

5. Peel away the post-it note mask and you will be left with two balloons - one will appear to be behind the other one as shown in the photo above.

6. Add to the scene using the other two balloons - I've stamped one of each size beside the two masked balloons. Colour the balloons using Promarkers.

7. To make the stand for the card, cut a piece of white card measuring 28cm by 4cm. With the longest edges towards you, score lines at 2cm, 4.5cm, 7cm, 21cm, 23.5cm and 26cm. You will be left with a piece in the middle of the strip measuring 14cm by 4cm - on to this piece mat a piece of brown paper measuring 13.5cm by 3.5cm and a piece of patterned paper measuring 13cm by 3cm as shown in the photo above. The stamp the sentiment from the 'Up, Up and Away stamp, trim and mat on to a piece of brown paper. Attach this to the patterned paper as shown in the photo.

8. Concertina fold both ends of the strip of card as shown in the photo above.

9. This photo (above) shows the folds from above.

10. Cut a piece of white card measuring 14cm square. Attach to this a piece of brown paper measuring 13.5cm square and a piece of patterned paper measuring 13cm square. The mat the coloured image panel on to a piece of brown paper measuring 11cm by 9.5cm and stick this near to the top of the patterned paper as shown in the photo above.

11. Next attach the stand to the card securing the end flap on each side of the strip to the back of the card - I've shown one side in the photo above.

12. Finish the card with some Card Candi coloured with the Sandstone Promarker.
Here's another example of this card shape using 'Book Owl':

and another example of masking using the 'Hot Air Balloon' stamp:

**********************************************
Little Claire Friday Blog Project - Pink Elephants
This appeared on the Little Claire Blog on 13 December 2013


Little Claire Friday Blog Project - Pink Elephants
This appeared on the Little Claire Blog on 13 December 2013

I thought we'd have a change from Christmas projects this week and instead I'm sharing a card made with one of my favourite Little Claire stamps, the very cute 'Elephants in Squares'.
Here's what you'll need to make the card:
Elephants in Squares stamp set (also available here as a digi download)
grey card
And this is what you need to do:
1. Cut a piece of white card measuring 21cm by 17cm. With the longest sides of the card facing you and working from the left hand side, score lines at 5cm, 8cm, 13cm, 16cm and 21cm as shown in the photo below. A little tip - if you don't have a score board, use your paper trimmer to measuring and score. Lift up the arm and blade, measure and score along the cutting groove.

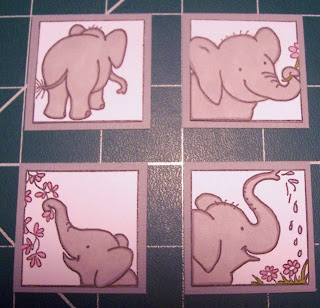
2. Next stamp the 'Elephants in Squares' on to the white card using the Memento ink and colour in using Promarkers.

3. Cut out the four squares and then mat on to pieces of grey card measuring 4cm square as shown in the photo below:

4. Next, fold your base card. It folds concertina style to give six panels - three wider and two narrow as shown in the photo below:

5. Next cut three pieces of grey card measuring 16.5cm by 4.5cm and three pieces of patterned paper measuring 16cm by 4cm and mat these together as shown in the photo below:

6. These are then attached to the three wider panels of the card (leaving two narrow panels in between) as shown in the photo below:

7. Next, attach two of the elephant squares to the middle paper covered panel - use the dots of the paper as a guide to get them straight both horizontally and vertically as shown in the photo below. Remember only to put tape or glue on half of the square!

8. One of the other squares is then attached in the middle of the first paper covered panel and the final square in the middle of the last paper covered panel as shown in the photo below. Again, use the dots on the paper as a guide to line up the squares:

9. Finally, attach he outline sticker sentiments and black self adhesive gems as shown in the photo below:

This style of card would work with any small stamps - here's another example using 'Daschunds in Squares':

************************************
Little Claire Friday Blog Project - Waterfall Card
This appeared on the Little Claire blog on 11 October 2013

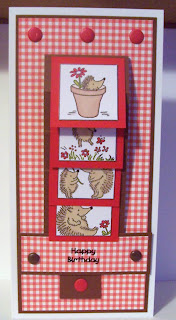
This week's Friday blog project is a waterfall card using one of my favourite Little Claire stamps, 'Hedgehogs in Squares'.
Here's what you'll need to make the card:
brown card
brads
And here's what you need to do:
1. Cut pieces of brown card measuring 20cm by 9cm and 9cm by 3cm and then pieces of red gingham paper measuring 19.5cm by 8.5cm and 8.5cm by 2.5cm. Attach the pieces of gingham paper to the brown card as shown in the photo below.
1. Cut pieces of brown card measuring 20cm by 9cm and 9cm by 3cm and then pieces of red gingham paper measuring 19.5cm by 8.5cm and 8.5cm by 2.5cm. Attach the pieces of gingham paper to the brown card as shown in the photo below.

2. Next, to create the waterfall mechanism, cut a piece of brown card measuring 29cm by 5cm. With the longest sides of the card towards you, work from the left hand side of the card and score it at 14.5cm, 17cm, 19.5cm and 22cm.

Your finished scored card should look like this:

Fold the card along the score lines and place to one side.
3. Stamp the four panels from the 'Hedgehogs in Squares' stamp on to white card and cut out along the solid black lines. This will give you four squares measuring 3.5cm square. Colour the stamped image with Promarkers and then mat on to pieces of red card measuring 4.5cm square.

4. Starting with the image you want to appear last on the waterfall card, attach each square to the scored and folded card strip using red line tape - make sure you only attach the top half of the red square to the brown strip so that the image panels 'flip up' as the card is rolled. In each of the photos below you'll see that the images fit underneath each other as you attach them to the strip of card and each one is stuck just below the score line.


The first image is attached just below the first score line (the one at 14.5cm)

5. Next, attach the smaller of the brown card and gingham paper panels you prepared earlier to the front of the brown strip - it needs to tuck under the bottom stamped image as shown in the photo below. At the other end of the strip of brown card, attach a small card 'tab' using red line tape - don't remove the backing from the tape. This 'tab will be used to pull the waterfall.

6. Next you need to attach the mechanism to the larger of the panels you prepared earlier. This is done using brads at either side of the panel you've just attached to the strip of brown card - don't stick it with glue or tape because the mechanism won't work. This is one of the reasons why I've used gingham paper - the lines make it really easy to line up the holes for the brads to keep them on the same level.

7. Tuck the other half of the brown card strip behind the part with the images on so that the 'tab' you created earlier appears below the strip with the brads on it as shown in the photo below.

8. The panel can now be attached to your card. I've used a DL sized card which can also be created from a piece of white card measuring 20cm by 20.5cm folded in half to give a blank measuring 10cm by 20.5cm. I've added some Card Candi coloured with a Poppy Promarker and an outline sticker sentiment to finish the card.

And here's a side view of the mechanism as it's pulled through.

I hope you like the finished result - once you see how the mechanism works, the card is easy to create but looks impressive. It would also work with any of the other 'squares' stamps like 'Elephants in Squares' and 'Daschunds in Squares'.
***********************************************
Little Claire September 2013 Club Card
This month it was my turn to design the card using the new club stamp set 'Feed the Birds'. All club members received the pre-cut materials to make the card which you can see above. In this post I'm going to share some more detailed instructions and also a few extra photographs.
Here's what you'll need to make the card:
brown ink pad (the older, the better!)
white sheer ribbon
Promarkers - Pear Green, Poppy, Caramel, Sandstone, Tan, Cardinal Red, Satin, Blush, Buttercup, Cool Grey 3
And here's what you need to do:
1. Attach the image of the little girl and tree to an acrylic block and use a piece of masking tape to cover up the tree. If you look at the picture below, you'll see that I've placed the tape at an angle so the two little birds on the ground will still stamp but the tree won't. Ink the stamp with the Memento ink, as I have in the photo, and then remove the masking tape before stamping the image on to a piece of card measuring 6.5cm by 4.5cm

2. This is what the stamped image should look like:

3. Next, follow the same process in reverse to get the stamped tree image. Cover up the little girl on the stamp with masking tape as shown in the photo before, ink up and then remove the masking tape before stamping the image on a piece of card measuring 6.5cm by 4.5cm.

4. And this is what the resulting stamped image should look like:

5. Next stamp the remaining two panels - the sentiment on to a piece of card measuring 5.5cm by 2.5cm and the calendar image on to a piece of card measuring 6.5cm by 5.5cm. Your four stamped images should look like this:

6. I've created a 'faux layer' round each of the stamped image panels using the chisel tip of the Sandstone Promarker. Hold the card against the tip of the Promarker - it will sink in to the tip slightly - and then 'wipe' down each edge of the card in one continuous stroke. Do this as lightly as you can and build up the layers of colour.


7. Colour the rest of the images using Promarkers.
8. Before attaching the kraft and the patterned paper to the tag, edge with the brown ink pad. Ideally, you need an old, dry ink pad for this and again, build up the colour on the paper.
9. Layer up the tag as shown in the photo above. Finally, colour the ribbon using the Cardinal Red Promarker. To do this, lay the ribbon flat on scrap paper and then 'wipe' along it with the chisel tip of the Promarker. With a darker colour like the Cardinal Red, you will probably only need to do this one to colour both sides - lighter colours need more ink applied to them.


10. Cut the ribbon in to four pieces and tie through the tag. Close the tag, hold all the ribbons together and cut all four at once to make them the same length.

************************************************
Little Claire Friday Blog Project - We Three Ships
This appeared on the Little Claire blog on 23 August 2013

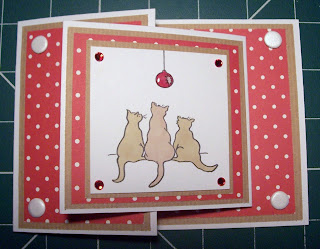
For today's card I've used one of this year's new Christmas stamps 'We Three Ships' and made an easel card with a slight difference.
Here's what you'll need to make the card:

white 14.5cm square card blank
brown ink pad (the older, the better!)
Spellbinders oval dies
Promarkers - Pear Green, Poppy, Cardinal Red, Sandstone, Tan, Buttercup
And here's what you need to do:
1. Place the card blank on the table with the shortest edges facing you. Measure 4cm from each side along the card fold and cut, making the cut inside the score line. Then cut down from the score line to the base of the card as shown in the photo below:

2. This is what your card should look like when it's been cut:

3. Next, fold the smaller panel in two to the score line as you would with a normal easel card:

4. Stamp the main image on to the white card using the Memento Ink. Die cut the image using the second largest oval die and colour in with Promarkers. Die cut an oval from the kraft paper using the largest of the oval dies and then edge the kraft paper using a brown ink pad. An older, drier ink pad is best for this - it lets you build up the colour gradually.

5. Next, on the base of the card layer up pieces of kraft and patterned paper as you wish - I've used the red spotted and green spotted paper from the Back to Basics Christmas pack. The layers I've used are 13.5cm square kraft, 12.5cm square patterned, 10.5cm square kraft and 10cm patterned. Trim the corners of the folded panel of the card as shown in the photo - this avoids any of the white card being seen underneath or at the sides of the oval panel:

6. Attach the image panel to the kraft oval and then stick this on the front of the white card panel making sure the base of the oval is level with the bottom of the white panel:

7. To make the stopper for the easel, use a piece of kraft paper measuring 13.5cm by 3.5cm and a piece of patterned paper measuring 13.5cm by 3cm. Use the brown ink pad on the kraft layer and then stick the patterned paper on top. Stamp the circular sentiment, colour in the stars and attach this to the middle of the stopper:

8. Attach the stopper strip to the base of the card using foam pads and then finish the card with some red gems and Card Candi coloured with Pear Green Promarker.

This type of card construction works just as well with different shaped front panels. Here's a card I designed for one of the classes at the end of last year using the 'Christmas Owl Tree' stamp which you can find here on the website:

*********************************************
Little Claire Blog Project - 'Joy(fold), Hope and Wonder
This appeared on the Little Claire blog on 26 July 2013


1. Cut a piece of white card measuring 29cm by 10.5cm and, with the longest side of the card facing you, score and fold to make a C6 size card with the fold line along the shorter side. Trim 7.5cm from the front of the card to leave a card blank as shown on the left of the above photo. Next cut a piece of white card measuring 18cm by 8.5cm, score and fold in half to make a second card blank as show on the right in the above photo.


Little Claire Blog Project - Dinkies Tag CardThis appeared on the Little Claire blog on 26 July 2013

Today I'm sharing a little bit of Christmas in July with one of the brand new Little Claire Christmas stamps!! This stamp is called 'Joy, Hope and Wonder' - it's a great design and really easy to colour in making it perfect if you've got lots of Christmas cards to make. You can find it here on the Little Claire website.
I've used the stamp to make a simple joyfold card - here's what you'll need to make the card:
red self adhesive gems
And this is what you need to do:

1. Cut a piece of white card measuring 29cm by 10.5cm and, with the longest side of the card facing you, score and fold to make a C6 size card with the fold line along the shorter side. Trim 7.5cm from the front of the card to leave a card blank as shown on the left of the above photo. Next cut a piece of white card measuring 18cm by 8.5cm, score and fold in half to make a second card blank as show on the right in the above photo.

2. Stamp 'Joy, Hope and Wonder' on to a piece of white card measuring 6.5cm square using the Memento ink pad - you will see that I haven't used all of the string attached to the bauble. Colour in the image using Promarkers as shown in the photo above.

3. Layer the stamped image on to a piece of kraft paper measuring 7cm square, a piece of patterned paper measuring 8cm by 7.5cm and another piece of kraft paper measuring 8.5cm by 8cm. Put the smaller of the card blanks in front of you with the fold to the right hand side (the opposite of normal) and attach the layered image to the top of the card as shown in the photo above.

4. Open the smaller card flat and to the inside of the card (as shown in the photo above) attach a piece of kraft paper measuring 8.5cm by 8cm and a piece of patterned paper measuring 8cm by 7.5cm. Cut a piece of kraft paper measuring 5.5cm by 1.5cm and stamp the sentiment on to this using the Versafine ink. Attach it to the centre of the panel (as shown in the photo above)

5. Next put the larger card blank in front of you with the fold to the left hand side as normal. Attach a piece of kraft paper measuring 6.5cm by 10cm and a piece of patterned paper measuring 6cm by 9.5cm to the front shorter flap of the card. Then, to the inside of the card attach a piece of kraft paper measuring 14cm by 10cm and a piece of patterned paper measuring 13cm by 9.5cm.

6. Stick the smaller card to the inside of the larger card - the fold on the smaller card will still be on the right and the fold on the larger card on the left (as shown in the photo above)

7. The photo above shows how the card will look when the smaller card is opened to show the sentiment inside.

8. To finish the card add red self adhesive gems to the corners of the stamped front of the card and Card Candi to the outside four corners as shown in the photo above. Finally, put some Glossy Accents on the bauble.

Here's another example of a joyfold card which I designed for one of the recent Little Claire classes using the 'Made for Men' set and 'Dictionary Definitions'

***********************************************
(this appeared on the Little Claire blog on 24 May 2013)

Welcome to another Friday blog project - Helen N
here this week with a Dinkie tag card for you. The stamp I've used is
part of a brand new range from Little Claire called Dinkies and if you
haven't seen them yet, have a look here on the website.
The
Dinkies are a gorgeous selection of Little Claire favourites which have
been made smaller than the original designs and they are all priced at
£2. But just because they are smaller, it doesn't mean that they only
work on small cards. The smaller design gives you lots of scope for
repeat stamping, building up patterns and making different shaped cards
plus they are perfect for ATCs.
Here's what you'll need to make the card:

Promarkers - Poppy and Pear Green
white sheer ribbon
Spellbinders Labels 11 dies
Spellbinders Lacey Circle dies
corner rounder punch
And here's what you need to do:
1.
Using the smallest die, cut three shapes from white card. Stamp the
Poppies stamp twice on to each shape as shown in the photo below.

2. Colour these panels using the Poppy and Pear Green Promarkers

3.
Next using the next size up Labels die cut three shapes from the kraft
paper. Then die cut a circle from the Lacey Circles set again from the
kraft paper. You also need to cut four pieces of kraft paper measuring
8.5cm by 7cm and four pieces of the red paper measuring 8cm by 6cm. Use
the corner rounder punch to round the bottom two corners of each piece
of paper.

4.
Stamp your choice of sentiment from the 'Dictionary Definitions' set on
white card and then cut round the sentiment. Mat this on to the kraft
circle die cut.
5.
Assemble the first, second and fourth panel of the tag card as shown in
the photo below. On the third panel attach the kraft and red paper as
for the other panels and then add the sentiment.

6.
Next you need to colour your ribbon. Promarkers colour white sheer
ribbon beautifully and if you do this, your ribbon will always match the
colours in your project. To colour the ribbon, put it flat on a piece
of scrap paper and use the chisel end of the Promarker to sweep along
the ribbon making sure your pen covers the whole of the ribbon including
the edge. With darker colours (like the Poppy) you will probably only
need to go over the ribbon once to colour it but if you're using a paler
colour, you might need to go over it a few times.
7.
Cut four pieces of ribbon and tie them through the holes at the top of
the tag card. A little tip for getting the ribbons all the same length
is to close the card, hold all the ribbons together and then trim
them.

8. And here's the finished card again:
*****************************************
Little Claire Club Card - May 2013

Here's what you will need:
Happy Days stamp set
club kit materials pack
Post-it note
foam pads
Tuxedo Black Memento ink pad
Promarkers
And this is what you need to do:

1. Put the deckchair stamp on an acrylic block and then use a small piece of masking tape to cover the line to the side of the deckchair. Ink the stamp and remove the masking tape before stamping the image on to a Post-it note. Make sure the leg of the chair is on the sticky part of the post-it.

2. Cut round the outside edge of the chair as shown in the photo above.

3. Using a piece of masking tape as before, stamp the image again to the side of the piece of white card in your pack as shown in the photo above.

4. Stick the Post-it note over the image stamped on the white card so it matches exactly as shown in the photo above.

5. Put the bird table stamp on acrylic block and then use a small piece of masking tape to cover the bird on the bird feeder.

6. Ink the stamp and then remove the masking tape before stamping it so that the grass at the base of the bird table overlaps the chair leg as shown in the photo above.

7. Remove the Post-it note and then colour your stamped images using Promarkers. I've used Caramel, Sandstone, Tan, Pear Green, Pastel Blue, Denim Blue, Blush and Buttercup.

8. Cut away half of the front of the card blank in your pack and then layer up the pre-cut papers as shown in the photo above. Attach your image panel to the kraft card and then to the front of the card remembering to only put adhesive on one side of the panel. Stamp the circular sentiment, cut out and colour the birds and hearts.

9. On the inside of the card, layer up the pre-cut papers provided and then stamp the lawn mower on the piece of white card provided, layer on to kraft paper and add to the middle of the panel.
*******************************************
Little Claire Blog Project - Tag Card Notebook
(this appeared on the Little Claire blog on 12 April 2013)

Here's what you'll need to make the notebook:

white copy paper
black line peel offs
black self adhesive gems
sheer ribbon
stapler
corner rounder punch
strong double sided tape
Promarkers - Poppy, Moss Green, Black, Cinnamon, Caramel, Tan, Sandstone
And here's what you need to do:

1.
Put the 'Little Doggies' stamp on an acrylic block and then put small
pieces of masking tape over the three flowers underneath the main
design. Ink the stamp using the Memento ink pad, remove the masking
tape (take care when doing this because it will be inky) and then stamp
the image on to a piece of white card.

2. Trim the white card to measure 7.5cm by 4.5cm and colour in using Promarkers

3.
Cut two single panels from the tag card (each card has four panels).
Measure 3.5cm from the top of the middle scallop on the panel and draw
and score a line across the tag as shown in the photo above. This forms
the 'hinge' for the notebook. Repeat this on a second tag panel.

4.
Cut pieces of white copy paper measuring 8.5cm by 7cm - these are the
pages of the notebook so you can vary how many you add. Staple the
papers at one side as shown in the photo, keeping the staple as near to
the edge of the pages as you can.

5.
Use a strip of strong double sided tape to attach the pages to the back
cover - put the tape on the tag just above the score line (between the
punched hole and the score line), remove the backing and then line up
the pages as shown.

6.
Apply another strip of tape to the inside of the front cover and then
attach this to the pages lining up the two tag panels. Cut a piece of
patterned paper (I've used the red gingham design from the Riverbank
Revels pack) and round two of the corners using the punch. Attach this
to the front cover between the scored line and the end of the tag and
then add the stamped image.

7. The score line on the front of the note book allows the front cover to open as shown in the photo above.
8.
To finish, add black gems at each corner of the image panel and peel
off black lines just above the score line. Then add ribbon tied through
the holes in both tag panels.

Tips
1.
Covering up part of the stamp with masking tape before inking it up is a
great way of getting more use out of your stamps. It also works really
well with the little embellishment stamps in the 'Changing Tree' stamp
sets which have strings on them. A good example of this is the news
paper in the 'Changing Tree Man'
set - it means you will have a newspaper which can hang from one of the
branches but also a newspaper which can sit in the tree itself.
2.
If you don't have ribbon in the right colour for your card, colour it
using a Promarker. I've used sheer white ribbon which I coloured with
my black Promarker. Put the ribbon flat on scrap paper and run the
chisel end of the Promarker along the length of the ribbon. Make sure
the ribbon is dry before using it on your project.
No comments:
Post a Comment
Thanks for leaving me a comment - I really do appreciate it.
Helen x